Showing posts with label Spray Paint. Show all posts

Tuesday, July 24, 2012

Dual-Purpose Cooler

If you wonder where we get our crafty side, it is from my mom! She's letting us share her latest project, a little cooler upgrade. We've had this little blue cooler around for as long as I can remember. It's come with us on camping trips, to parks and has played a role in parties in our backyard. My mom wanted to give it a face list, as well as turn it into a sitting bench for the backyard.


We don't have a proper 'before' picture, but you can see in the picture below the colour blue it was.


My mom simply sanded down the cooler and then spray painted the cooler red to start with. It worked well to cover the blue, except she had trouble with the handles.


The next step was to make a seat. For the base she used an old school desk top and bought some foam and some outdoor fabric to cover it with.


She used an electric knife to cut the foam to size, and she said it 'cut like butter' it was so easy. To attach it to the table top she used spray adhesive. Finally she wrapped the fabric around the whole thing.


We think she did a great job. She still has plans to attach the seat to the cooler with velcro and fix up the handles. But it is such a nice addition to the backyard and is so handy to store pop in and provide some extra seating outside.

Happy Crafting,

PS: Here's where we link up.

Tuesday, July 3, 2012

Custom 3D Butterfly Decals

Lately I've been seeing these 3D decals everywhere, and so when I found a package for $15 at Wal-Mart I snatched them up. The only problem was that they were white and all I have in my apartment are white walls (or floral walpappered ones). So a little paint job was in order...


I first tried to paint them with a little tube of grey crafting paint. The first layer went alright, but when I tried to put on the second it wouldn't stick and started peeling off the first layer of paint.


Which meant this was just as good a time as any to try my hand at spray painting. I made a second trip to Wal-Mart and grabbed a bottle of grey spray paint and took my butterflies outside. It wasn't too bad a process, the light wind wasn't especially helpful, but overall it turned out okay. After a little hiccup where the wind picked up the newspaper, I solved the problem by placing rocks on top of the newspaper and then let it sit for a couple hours.


The I moved my newly-painted butterflies inside and upstairs. To decide where to hang them I used post-it notes to help me with the layout.


Then to hang the butterflies I used the double-sided sticky pads included in the box. I slightly veered from the sticky notes but only because I didn't spread them out enough.


I'm really happy with how they turned out. Only two didn't turn out so well so I didn't hang them, but I don't think I really need them anyways! This project was a great reminder for me that just because something is ready to go out of the box, doesn't mean you can't put your own personal spin on it and customize it to your liking.


Happy Crafting,

PS: Here's where we link up.

Monday, June 25, 2012

Nature Art

I love spring and summer with all the greenery and flowers. This past weekend I went up north a bit to a bridal shower for a wonderful girl. As I was there I couldn't help notice the beautiful gardens and big open green spaces. I wanted to incorporate these elements in some art for my home.

I raided my weed patch garden and found some leafy stems. I glued them with white glue onto the card stock I had chosen.

Then I took the papers outside and use some white spray paint. I had used the spray paint to paint my clock here. I immediately peeled off the leaves from the paper. There was just a little white glue residue left on the paper, which dried clear. I let them dry over night and then they were ready. Aren't they perfect for bringing some nature inside?

Happy Crafting,

PS: Here's where we link up.

Wednesday, June 6, 2012

Thrift Store Find: Tabletop Clock

I love to go to the thrift store. I've had a hard time finding one close to my new house, but last week I took the bus for a big shopping trip to Value Village. Here are some of my finds. I used the lampshade for the mobile I made for my niece.
Today I'm going to show you what I did with the clock. I really wanted a nice clock for our office/guest room. Remember the jute container I made here? I thought this little guy would fit perfectly on the table and keep good time for our guests.
The clock was only $2.99, but I wasn't sure if it would work. So I started by taking it apart.
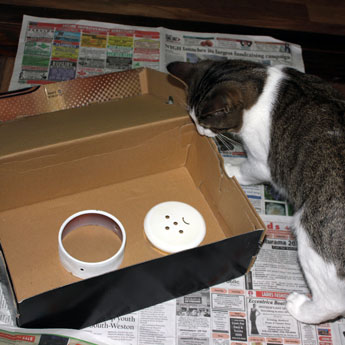
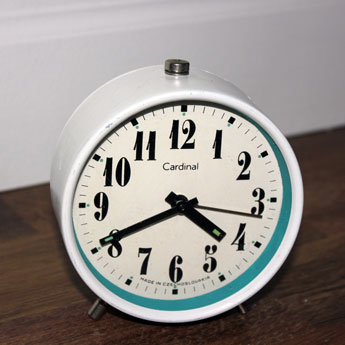
Then I sanded and painted the outsides white and the inside ring blue. Of course, Merlin had to help out.
I wound the clock and it worked! It looks very nice on my side table. 

I can't wait to show you more of the stuff I've made out of thrift store finds. 

Happy Crafting,

PS: Here's where we link up.

Sunday, May 20, 2012

Child Adirondack Chair

Happy Victoria Day!

Here in Canada we're relaxing with a nice long weekend. I hope you are enjoying yourself. Today I have something great to show you today.

When I was at my parent's last week for Mother's Day, my Dad saw this cute little chair across the road. It was set on the curb, ready to be picked up by the garbage truck. I hurried over there and quickly saved it from destruction. My Mom has a few adirondack chairs by the pool and I thought my niece would love one that was just her size.

I grabbed some sand paper, Apple Red spray paint, a paintbrush, and some grey acrylic paint. I started by sanding down the chair, wiping it down with a damp cloth, and then spray painting it.

I wanted to add a little something to the chair to make it pop. I found some grey acrylic paint and added some vines.

I can't believe how great it turned out.


I will take some pictures of the chair by the pool when I go to my parents' next. I think my niece will love having her own chair to sit on.

Happy Crafting,

PS: Here's where we link up.
Related Posts Plugin for WordPress, Blogger...