Showing posts with label DIY. Show all posts

Tuesday, July 24, 2012

Dual-Purpose Cooler

If you wonder where we get our crafty side, it is from my mom! She's letting us share her latest project, a little cooler upgrade. We've had this little blue cooler around for as long as I can remember. It's come with us on camping trips, to parks and has played a role in parties in our backyard. My mom wanted to give it a face list, as well as turn it into a sitting bench for the backyard.


We don't have a proper 'before' picture, but you can see in the picture below the colour blue it was.


My mom simply sanded down the cooler and then spray painted the cooler red to start with. It worked well to cover the blue, except she had trouble with the handles.


The next step was to make a seat. For the base she used an old school desk top and bought some foam and some outdoor fabric to cover it with.


She used an electric knife to cut the foam to size, and she said it 'cut like butter' it was so easy. To attach it to the table top she used spray adhesive. Finally she wrapped the fabric around the whole thing.


We think she did a great job. She still has plans to attach the seat to the cooler with velcro and fix up the handles. But it is such a nice addition to the backyard and is so handy to store pop in and provide some extra seating outside.

Happy Crafting,

PS: Here's where we link up.

Tuesday, July 3, 2012

Custom 3D Butterfly Decals

Lately I've been seeing these 3D decals everywhere, and so when I found a package for $15 at Wal-Mart I snatched them up. The only problem was that they were white and all I have in my apartment are white walls (or floral walpappered ones). So a little paint job was in order...


I first tried to paint them with a little tube of grey crafting paint. The first layer went alright, but when I tried to put on the second it wouldn't stick and started peeling off the first layer of paint.


Which meant this was just as good a time as any to try my hand at spray painting. I made a second trip to Wal-Mart and grabbed a bottle of grey spray paint and took my butterflies outside. It wasn't too bad a process, the light wind wasn't especially helpful, but overall it turned out okay. After a little hiccup where the wind picked up the newspaper, I solved the problem by placing rocks on top of the newspaper and then let it sit for a couple hours.


The I moved my newly-painted butterflies inside and upstairs. To decide where to hang them I used post-it notes to help me with the layout.


Then to hang the butterflies I used the double-sided sticky pads included in the box. I slightly veered from the sticky notes but only because I didn't spread them out enough.


I'm really happy with how they turned out. Only two didn't turn out so well so I didn't hang them, but I don't think I really need them anyways! This project was a great reminder for me that just because something is ready to go out of the box, doesn't mean you can't put your own personal spin on it and customize it to your liking.


Happy Crafting,

PS: Here's where we link up.

Thursday, June 28, 2012

Cupcake Pencil Toppers

I love bright summer colours and using felt is a great way to utilize those wonderful colours. Today I am going to show you how I made cupcake pencil toppers
I cut out a little cupcake template on white paper and then a rectangle a little bigger than the base of the cupcake. I chose to cut out the cupcakes purple, pink, and blue, while I did the base a nice brown. Make sure you cut out two of everything for each pencil topper.
My first step was to glue sequins onto the cupcakes with some white glue.
All I had left to do was sew the brown base to the cupcakes and then sew two together to make the topper.

We wish you all a happy long weekend! Stay tuned next week for our Canada Party and some other great projects we have been working on.

Happy Crafting,

PS: Here's where we link up.

Thursday, June 21, 2012

From side table to TV stand

This post is really a 'part two' (or 'part deux' if your feeling French) of a guest post I did over at Chic on a Shoestring Decorating that you can find here.

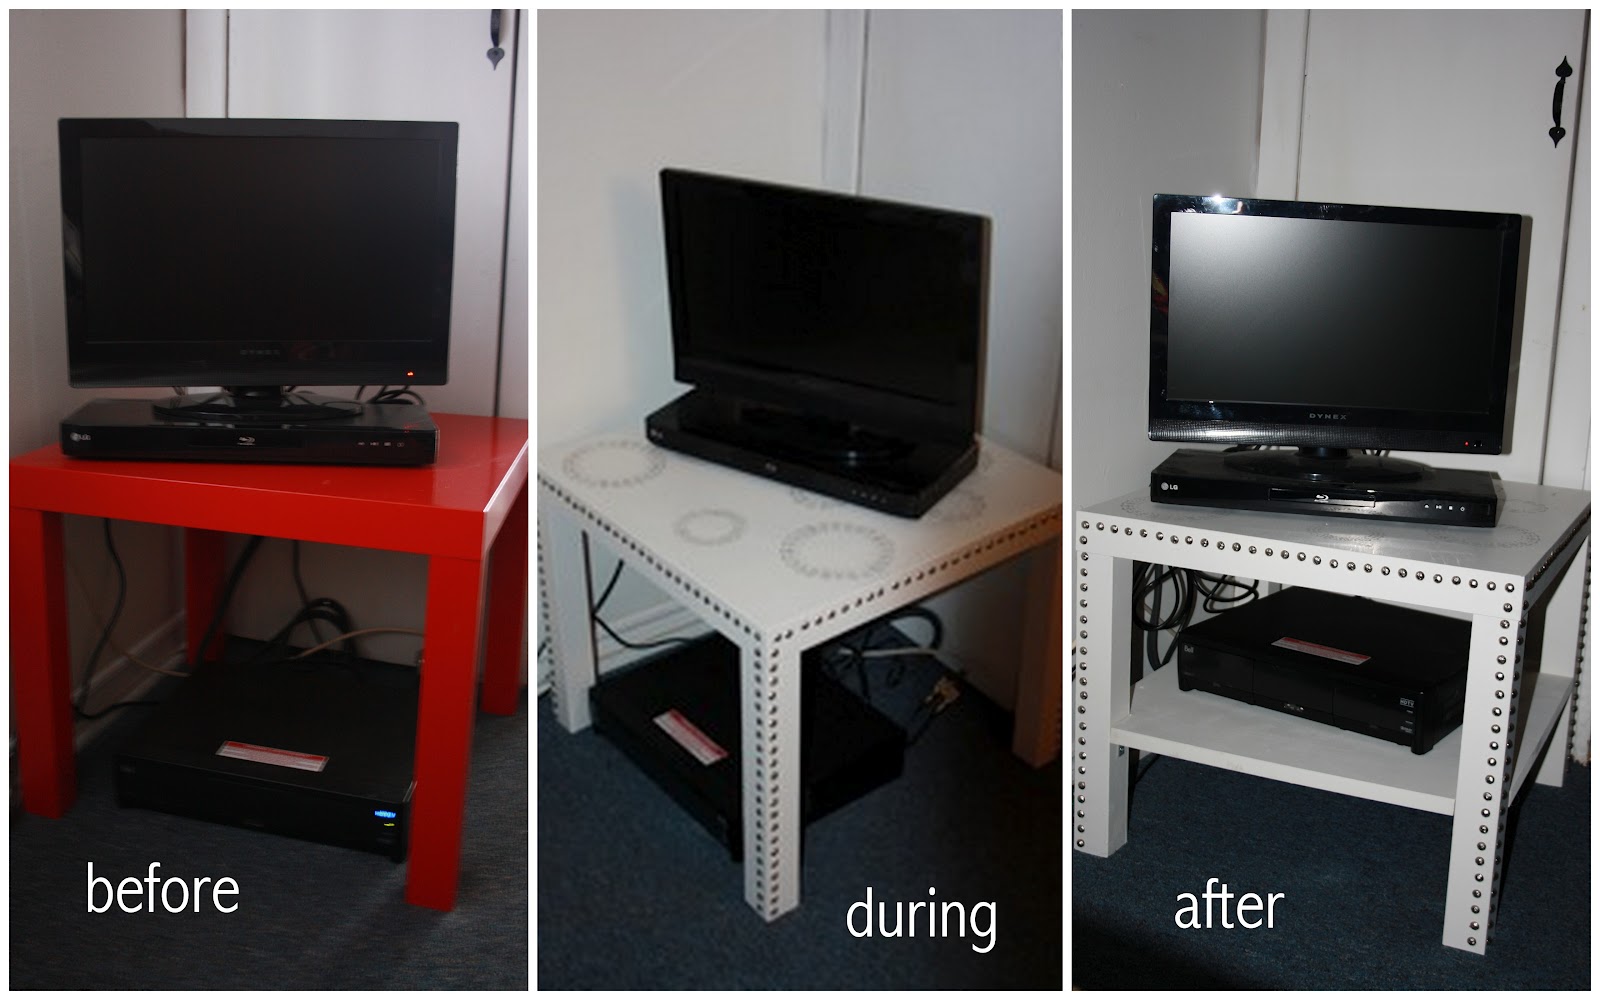
If your wondering, I used a red IKEA side table in my last apartment as a TV stand. But here I decided it needed to look a little more fancy and 'grown-up' so I painted it white, stencilled the top and used some upholstery nails to decorate it.


Once I showed my handiwork off to my dad, he came up with an idea to take it one step further - adding a shelf! I took the measurements of the outside and inside of the legs, following his diagrams below:


The measurements were, in case you are interested, 
From outer leg to outer leg, 54 and 4/5 cm
From the inside of both legs, 44 7/10 cm

Then, on my next visit home, we tackled the project together. He had a spare piece of wood/particle board or something lying around that we could use. We looked it over carefully and found a good section, and then used a table saw to cut a large square (54 and 4/5 cm x 54 and 4/5 cm).


Then to get the little gaps to go around the legs, we simply marked them out with a pencil and ruler and then used a little handheld saw-like too (sorry, don't know the proper terms!) to cut them out.


To give it a smooth finish I tried my hand at the power sander, which is actually a very peaceful activity. Finally we measured the centre of each little "gap" and screwed in some brackets which would attach on the other end to the table legs. In total we attached four brackets, one for each leg.


My dad pre-drilled the holes for the screws in the new shelf, and then we attached the brackets and it was ready for me to take back home to attach to my table.

Luckily my measuring twice and cutting once method worked and it was a perfect fit! From there it was as simple as screwing in the brackets to the table. To do this I flipped the table upside down and put a couple of boxes in the middle of the table. Then I carefully slid the new shelf over the legs to rest on the boxes.


And finally, FINALLY, the last step was to paint the shelf white to match the rest of the table.


So there you have it, how I completely, upgraded my red IKEA side table to a TV stand with an extra shelf!


Happy Crafting,

Thursday, June 14, 2012

Alphabet Fun

Recently I've been having a lot of fun playing with my Adobe products, but mainly Illustrator. Now, I am by no means an expert, I only learned a little bit about them in school, but half the fun is trying things out and seeing how all the different tools and buttons work. The best part? If I make a mistake the trusty 'undo' option is always there!

So today I'm going to show you how to make some personalized alphabet art. I saw this a while ago, I forget where now, and the main idea was to do it for a nursery. But I think if you choose the right fonts and the right colours you can class it up enough to hang right in your living room!

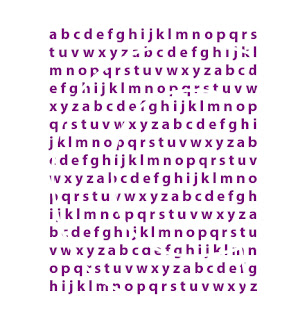
To start with, choose a font that you like. Make you especially you like it in the letter you are going to use. I suggest using the first letter from either your first or last name.
But instead of outlining it in black, change the stroke line to white. Make sure you are using white and not just the blank, no-colour option. Also, make sure you use a large font to use up most of the space on the page (I used Myriad Bold at 581 points).

The next step is type out the alphabet on top on your large letter (I typed mine out at a 24 point size). My help hint is to type it out once, copy it and then paste multiple times until you cover the entire letter.
To make it all a little fancier, picked out the letters in your name and made them a different. And then just type out 'is for _____' below ( I did mine in Trajan Pro at 50 points).


Then export your project as a jpg and save it on your desktop. Now we're going to move over to Photoshop. Open your .jpg in Photoshop and take out the eraser tool. Using the white lines of your large letter, erase all of the excess small letters.


Just take it slow and steady, pausing a lot to save your project. Then, when your done erasing, you should have a perfect main letter, and an art piece completely personalized to you!


 I know a lot of people don't have these programs, so maybe you could use programs like Word? I may try it out and see what programs could be used to make this project that most people have.

Happy Crafting,

PS: Here's where we link up.

Thursday, May 31, 2012

Card Making Time

As I had mentioned before, when I'm feeling creative and have some time I like to make a bunch of cards so I can stock up. So today I'm going to share some of my latest cards and a little about how I made them.


For all my cards I use a a standard size of half of a 8 1/2 by 11 which I then fold in half. The great part about it is that each paper can make two cards and the card also fit easily into standard sized envelopes.


For this birthday card I used a letter stamp set to spell out 'happy birthday' and then a flower stamp to decorate around it. I thought the blue ribbon complimented the soft pink nicely. It turned out to be a nice card that would work for a girl of any age.


This thank you car was a little out of my element, but I think it came together nicely. The flower was hand drawn with just a regular pen, and then I used my mom's craft scissors to cut the jagged edges along the card.


This was just a random card, it was a new stamp so I wanted to try it out. Overall I just went for a simple look with a couple of ribbons to bring some texture and colour.


This was another card that came together. I traced out both the flower and the little hart, and used some little trivets to attach the 'thank you' note to the card.

So that was another foray into my card-making adventures. Who knows, maybe I inspired you to make some cards of your own???


Happy Crafting,

PS: Here's where we link up.

Tuesday, May 29, 2012

Big Girl Mobile

I love to make crafts for my adorable niece. When my sister started talking about her plans for a big girl room for my niece my mind started working. I thought of the perfect big girl mobile to hang in her room.
My inspiration come from two place. First, when Courtney and I were shopping at Pottery Barn Kids we saw this beautiful mobile.
Pottery Barn Kids

And second, I found this beautiful picture on Pinterest.

Style Me Pretty
These mobiles were both perfect because they are feminine and bright with natural elements. It was also important that the mobile wasn't babyish and could be with my niece as she grew up.

I started my going for a trip to a local thrift store. I found the perfect lamp shade. I was worried that it might be too tiny, but I think that it ended up working for my project.
After I removed the fabric from the lamp shade I saw that it had lovely fabric wrapped around the top and bottom circles. I decided to keep this on my mobile.
I found a perfect flower punch for the mobile and punched out yellow and cream flowers to hang from the lamp shade.
Mr. Firefly had the great idea to hang the mobile from the tripod. This helped me as I put the flowers on the mobile. I used a needle and thread to attach the flowers to the lamp shade. I also got some glue and glued on some fake flowers to the lamp shade.
This was so easy and looks very cute. The lampshade cost $2.99, the flowers were $5.99 and I only used half of them. I was lucky to find some scrap paper for the flowers. This project couldn't have turned out better. 

Happy Crafting,

PS: Here's where we link up.

Friday, May 25, 2012

Flower Napkin Ring

Finally! It's Friday! It's been a long week for me with a bunch of assignments and a busy time at placement. I'm so glad it's finally Friday and that I have a whole weekend to look forward to. That is, after my first test today.
It's been a while since I've posted a craft for you to do with your kids. Here's a great idea I got from one of my classmates. Her daughter had made this beautiful craft for her for Mother's Day. I thought this would be great for a spring or summer table setting.

Here's what you need:

  • Three different colours of felt
  • Scissors
  • Marker
First, you need to cut out a long piece of felt that looks like a bone. The age of your child depends on what he or she may be able to do. 
Next, you need to cut out two flowers, one smaller and one larger. Then, cut a small hole along the centre of both flower and on one side of the bone.
The last step it to piece it together. Fold the bone in half. Thread the two flowers onto it. Then stick the one side of the bone into the side that has the hole. 
You have just made a very easy, yet beautiful, napkin ring.
They look beautiful in a place setting. 
Now that I'm in school I have to share some knowledge with you. This craft will help your child's fine motor skill (cutting with scissors) and problem solving skills (figuring out how to put the napkin ring together). So why not do something fun with your child that can also help their development.

Enjoy your weekend and the beautiful weather we're having.


Happy Crafting,

PS: Here's where we link up.
Related Posts Plugin for WordPress, Blogger...